Yesterday I spent a lot of time, effort, and money making a batch of caramel covered Lorna Doones and pretzels, then dipping them in chocolate, just as I did last year. I used my Chocolate- Dipped Caramels recipe that I've made since 2006 but I was lazy and didn't use my candy thermometer. The caramel got too hard. I had to throw it all in the trash. Ouch. I don't have the time or money to do it over so I won't (although, it's likely I might - I'm sick that way).
It really put a damper on my baking spirit. I took a break, went to the gym, and came home and made a new cookie recipe that was pretty delicious but I'm still not over it.
It's weird but I really want to bake and I have a long list of things I want to make this year but I often find myself wondering why I am doing this. It's always hard when Christmas falls at the end of the week since I don't like to bake too far ahead and I have to work all week. At least I have Christmas Eve off this year and I can relax a little that day, I hope.
I have mixed feeling about the holiday. I am really looking forward to Christmas morning. I love shopping for my boys and I think they will be thrilled.
I'm not sure how the rest of the holiday will be though. Between the divorce, losing my mother two weeks ago, and now the threat of snow on Christmas (snow ruined my Thanksgiving - please don't let it ruin my Christmas!), I'm not sure what Christmas Eve and the rest of Christmas Day will hold but at least there will be Christmas morning to enjoy.
Monday, December 20, 2010
Friday, December 03, 2010
I lost my momentum
You thought I might be making a full-fledged blogging comeback? It doesn't look like it, not right now. My Thanksgiving holiday didn't quite turn out like I had planned (first year I didn't get even a taste of turkey or stuffing). I had high hopes for cooking something over my 4 days off but it never happened. This past week felt like a recovery operation. I can tell you that this December is probably not going to be a good month for blogging.
Tuesday, November 30, 2010
It's that time of the year again!
Time to start thinking about holiday baking and candy making.
This was last year's round up (which links back to previous years).
A few things to add from last year:
Reindeer Cookies using a chocolate sugar cookie recipe (recipe is on Domino Sugar site)

Rich and Dark Fudge Tassies - very chocolatey!

Drop Sugar Cookies (recipe is on Domino Sugar site)

Caramel and chocolate dipped pretzel rods and caramel covered chocolate dipped Lorna Doones using the caramel recipe from Chocolate Covered Caramels (I overcooked the caramel the year I took that lousy picture)

Candy-Cane Twists - an old, old recipe of mine that is a pain in the behind but so cute

South Seas Cookies - these were a big hit last year. I used my homemade caramel to make them

Butterhorns - another old recipe I brought out of retirement

These are recipes that I made in 2010 that might be good for the holidays too:
Lime Cooler Cookies

White Chocolate Dried Cherry (or Craisin) Cookies (SO GOOD!)

Big Soft Ginger Cookies (if you don't feel like making gingerbread men but you want something spicy)

Big Sugar Cookies - I'm definitely making these with Christmas sprinkles

Icebox Cookies - this is a great basic cookie that can be doctored up for the holidays

Cherry Chip Bars

This was last year's round up (which links back to previous years).
A few things to add from last year:
Reindeer Cookies using a chocolate sugar cookie recipe (recipe is on Domino Sugar site)
Rich and Dark Fudge Tassies - very chocolatey!
Drop Sugar Cookies (recipe is on Domino Sugar site)
Caramel and chocolate dipped pretzel rods and caramel covered chocolate dipped Lorna Doones using the caramel recipe from Chocolate Covered Caramels (I overcooked the caramel the year I took that lousy picture)
Candy-Cane Twists - an old, old recipe of mine that is a pain in the behind but so cute
South Seas Cookies - these were a big hit last year. I used my homemade caramel to make them
Butterhorns - another old recipe I brought out of retirement
These are recipes that I made in 2010 that might be good for the holidays too:
Lime Cooler Cookies
White Chocolate Dried Cherry (or Craisin) Cookies (SO GOOD!)
Big Soft Ginger Cookies (if you don't feel like making gingerbread men but you want something spicy)
Big Sugar Cookies - I'm definitely making these with Christmas sprinkles
Icebox Cookies - this is a great basic cookie that can be doctored up for the holidays
Cherry Chip Bars
Monday, November 22, 2010
Another short break?
Now that I've been posting more regularly again, I hate not having anything new to share with you today. I did cook this weekend but it was mainly for meals this upcoming week so I can't comment on the recipes yet. I winged a big pot of beef vegetable soup that came out pretty good. I should have taken a picture of that. I also have some recipes in the backup queue but I have to track down the actual recipes first. I am at a loss at to where some of them came from, it's been so long since I made them.
I think many blog readers will be busy getting ready for Thanksgiving so maybe I will just wait and pick up posting next week.
I don't have anything exciting planned for Thanksgiving, recipe-wise. I'm not doing a ton of pies this year. I'm taking a break. I am going to make the Deen Bros. Truffle Pie again. I love this pie.

Maybe I'll get a better picture this year.
My brother will be spending Thanksgiving with his new wife's family so I won't be making his favorite, Butterscotch Pie, which is also one of my favorites. I'm going to miss that pie but it is sort of labor intensive so I won't miss it too much.
Otherwise I am in charge of mashed potatoes and gravy but I have to do it with as little sodium as possible so I'm not too excited about that but at least I'll have the pie to look forward to!
I think many blog readers will be busy getting ready for Thanksgiving so maybe I will just wait and pick up posting next week.
I don't have anything exciting planned for Thanksgiving, recipe-wise. I'm not doing a ton of pies this year. I'm taking a break. I am going to make the Deen Bros. Truffle Pie again. I love this pie.
Maybe I'll get a better picture this year.
My brother will be spending Thanksgiving with his new wife's family so I won't be making his favorite, Butterscotch Pie, which is also one of my favorites. I'm going to miss that pie but it is sort of labor intensive so I won't miss it too much.
Otherwise I am in charge of mashed potatoes and gravy but I have to do it with as little sodium as possible so I'm not too excited about that but at least I'll have the pie to look forward to!
Friday, November 19, 2010
Pretty in pink

Maraschino Cherry Bars
Cookies 1,001 Mouthwatering Recipes From Around the World Copyright 2004
1 ½ cups all-purpose flour
1/8 teaspoon salt
¾ cup (1 ½ sticks) butter, softened
½ cup firmly packed brown sugar
1 tablespoon maraschino syrup (from a jar of maraschino cherries)
½ cup finely chopped maraschino cherries
Maraschino Frosting
Preheat the oven to 350 degrees F. Butter a 13x9-inch baking pan. (I think this is better suited to a 11x7-inch baking dish). Sift the flour and salt into a medium bowl. Beat the butter, brown sugar, and maraschino cherry syrup in a large bowl with an electric mixer at high speed until creamy. Mix in the dry ingredients and cherries until well blended. Spread the mixture evenly in the baking pan. Bake for 30-40 minutes, or until a toothpick inserted into the center comes out clean. Cool completely in the pan. If desired, spread the frosting over, Cut into bars.
Maraschino Frosting (This will make way more than you need)
4 cups confectioners’ sugar
¼ cup (1/2 stick) butter, softened
½ cup milk
2 tablespoons maraschino cherry syrup
16 maraschino cherries, finely chopped
Beat the confectioners’ sugar, butter, and milk in a large bowl with an electric mixer at high speed until smooth. (**I wouldn't add the milk all at once. Safer to blend everything else then add the milk until you reach the right consistency. **)Beat in the cherry syrup and cherries until well blended.
_________________________
I've had a jar of cherries in the cupboard for quite some time that I wanted to use in something. There are plenty of recipes that use maraschino cherries but this one was the least labor intensive and it didn't require any other special ingredients.
This is basically a shortbread, which I'm generally not crazy about. The frosting gave these a more personally pleasing texture for me (it softened the bars slightly). They are VERY sweet - don't cut them too large. They didn't blow me away right off the bat but everyone seemed to love them - they got a few 'extra' comments from the work crew and disappeared quickly. I was sorry to see the last one go since they really grew on me, but I'm still not sure if I would make them again. When it comes to sweets, I generally only remake the things that knock my socks off. As much as everyone enjoyed these, I don't think these fell into that category for me, since, like I already mentioned, I'm just not a huge shortbread fan. I could maybe see making them again if I needed a pink treat someday - I loved the color.
Thursday, November 18, 2010
Meatloaf recipes
Apparently I love meatloaf (or meat loaf, if you prefer). I've made quite a few of them and I thought it would be handy to put all the meatloaf recipes together in their own post. There isn't a true stinker in the bunch - I enjoyed them all. I couldn't tell you which one was the best either. That's really impossible to say.
As you can see in many of the pictures, I often cook my meatloaf ahead of time, then I grill it on my Cuisinart Griddler. Oddly, I never seem to make meatloaf with gravy. I'll have to work on that.
I'll add any future meatloaves I make to this list.
Laura P's Grandma's Meat Loaf, submitted by a reader, this meat loaf has a touch of sage in the meat and a touch of nutmeg in the sauce

Family-Style Turkey Loaf, a gluten-free meatloaf made with ground turkey

Herbed Chicken Meatloaf, a Greek-inspired meatloaf, served in a pita

Brown Sugar Meat Loaf, a classic from the Bridges of Madison County Cookbook

Buffalo Chicken-Blue Cheese Meatloaf, from one of the Biggest Loser Cookbooks

BBQ-Bacon Meat Loaf, another Biggest Loser recipe, made with ground chicken

Tomato Meat Loaf, there are no eggs in this version

Spicy Glazed Meat Loaf, a crockpot meatloaf - watch the salt in this!

Mom’s Meatloaf, a Diners, Drive-Ins and Dives recipe

Picante Meat Loaf, a diabetic recipe for meat loaf

Mom’s Meat Loaf, another slow-cooked version of meatloaf

Turkey Meatloaf with Brown Sugar-Ketchup Glaze, a Cook's Illustrated recipe, slightly fussier than your average meatloaf but not too complicated. It's from 'Best Light Recipes'.

Dutch Meat Loaf, an awful picture but this is one of my favorite meatloaf recipes

Mexican Meat Loaf, this one uses tortilla chips

Lyn's Meatloaf - this one has a ketchup-brown sugar glaze with cloves and allspice

As you can see in many of the pictures, I often cook my meatloaf ahead of time, then I grill it on my Cuisinart Griddler. Oddly, I never seem to make meatloaf with gravy. I'll have to work on that.
I'll add any future meatloaves I make to this list.
Laura P's Grandma's Meat Loaf, submitted by a reader, this meat loaf has a touch of sage in the meat and a touch of nutmeg in the sauce
Family-Style Turkey Loaf, a gluten-free meatloaf made with ground turkey
Herbed Chicken Meatloaf, a Greek-inspired meatloaf, served in a pita
Brown Sugar Meat Loaf, a classic from the Bridges of Madison County Cookbook
Buffalo Chicken-Blue Cheese Meatloaf, from one of the Biggest Loser Cookbooks
BBQ-Bacon Meat Loaf, another Biggest Loser recipe, made with ground chicken
Tomato Meat Loaf, there are no eggs in this version
Spicy Glazed Meat Loaf, a crockpot meatloaf - watch the salt in this!
Mom’s Meatloaf, a Diners, Drive-Ins and Dives recipe
Picante Meat Loaf, a diabetic recipe for meat loaf
Mom’s Meat Loaf, another slow-cooked version of meatloaf
Turkey Meatloaf with Brown Sugar-Ketchup Glaze, a Cook's Illustrated recipe, slightly fussier than your average meatloaf but not too complicated. It's from 'Best Light Recipes'.
Dutch Meat Loaf, an awful picture but this is one of my favorite meatloaf recipes
Mexican Meat Loaf, this one uses tortilla chips
Lyn's Meatloaf - this one has a ketchup-brown sugar glaze with cloves and allspice
Wednesday, November 17, 2010
Just what I needed
Lyn’s Meatloaf
Wal*Mart Family Cookbook Copyright 2008
2 cups soft bread crumbs
½ cup milk
½ cup Egg Beaters or 2 eggs, slightly beaten
2 tsp onion powder
1 tsp salt
¼ tsp ground black pepper
2 lb lean ground beef
Cooking spray
½ cup ketchup
1/3 cup packed brown sugar
1 tsp ground mustard
¼ tsp each allspice and ground cloves
1. Preheat oven to 350 degrees F. In large bowl stir together bread crumbs, milk, egg product, onion powder, 1 teaspoon salt and ¼ tsp pepper. Add ground beef; mix well. Spray 2-quart rectangular baking dish with no-stick cooking spray. Shape meat into loaf and place in 9x5x4 inch pan.
2. Bake, uncovered, for 45 minutes. Meanwhile in small bowl combine ketchup, brown sugar, mustard, allspice, and cloves. Pour sauce mixture over top of loaf. Bake for 30 minutes more of until a meat thermometer registers 160 degrees F. Let stand 10 minutes before serving.
Serves 8.
___________________________________________
I've been craving meatloaf. Since I cut back on using meat, meatloaf has definitely been off the table since most recipes require 1.5 to 2 pounds of meat. But I found some lean beef on sale and this recipe required no other special ingredients so it came out to $5-$6 to make this meatloaf. It went a long way. I froze individual slices and this made dinner for me and the boys, a few sandwiches for lunch and even one for breakfast. There's nothing wrong with a meatloaf sandwich for breakfast.
Since I've cut back on meat, especially since red meat has mainly left my diet, my butt has been dragging. I know that one does not need red meat to feel good but I guess I haven't been eating as well in general lately. Eating this meatloaf felt very therapeutic.
There was a time when allspice and cloves would have sent me running from this recipe but after trying this sloppy joe recipe with the cloves and loving it, these spices are what attracted me to this recipe. I loved what those spices brought to this. This recipe definitely hit the spot.
I hadn't been cooking and I really needed to cook again. Every so often I think, I'm done, I'm not cooking, I'll just grab whatever and get by, but I just can't eat like that. I need to plan, I need to cook, I need to get enjoyment out of my food.
I was going to list my other meatloaf recipes here but there are too many. I'll make a separate post.
I picked up this cookbook for 97 cents in the Goodwill store. It has a lot of great recipes, that I've seen before for the most part, but it's still nice to have so many good recipes in one place. Various brands sponsor the book but it's largely from-scratch cooking. It's from 2008 - does Wal*Mart put one of these out every year? If they do, I need to track more of these down and look for future versions. I think this originally sold for $4.96 which is a great deal.
Sunday, November 14, 2010
Hey, don't I know you from somewhere?

Share-The-Recipe Coffee Cake
Mary Engelbreit’s Fan Fare Cookbook Copyright 2010
1 (18.25 ounce) package yellow cake mix
1 (3.4 ounce) package instant vanilla pudding mix
1 teaspoon melted butter or margarine
1 teaspoon vanilla extract
3/4 cup vegetable oil
3/4 cup water
4 eggs
1 teaspoon ground cinnamon
1/2 cup granulated sugar
Topping
1 tablespoon butter or margarine, melted
1 teaspoon vanilla extract
1 cup confectioners' sugar
1/3 cup milk
Preheat the oven to 350 degrees. Grease and flour a 9x13-inch baking dish. In a medium bowl, mix the cake mix, pudding, melted butter, vanilla, oil and water until blended.
Add the eggs one at a time and mix for 4 to 6 minutes. Pour the batter into the baking dish. In a small bowl, mix the cinnamon and sugar together and swirl it through the top of the cake until it's no longer visible. Bake for 45 to 50 minutes.
While the cake is baking, make the topping. In a small bowl, mix the melted butter, vanilla, confectioners' sugar and milk together.
When the cake is out of the oven, pour the topping over the cake while it's still warm.
______________________________
This recipe caught my eye and I was excited to make it. The recipe author bragged about how everyone always asked for the recipe and how they served it as a groom's cake at a family wedding (in the shape of Texas). It was intriguing. And of course, I seem to love anything with a box of pudding in it.
But I ran into some problems. First, I wasn't sure how to swirl in the cinnamon-sugar mixture. I'm not sure I did it right. Some got in the cake but much of it settled on top. I need to work on that.
Then the 'glaze' was awfully liquid. I almost didn't add all of the milk but then I thought maybe this was more of a soaking glaze, like a tres leche cake or like my mother's rum cake.
HEY! Wait a minute. I think this is my mother's rum cake recipe!
Yes, this looks a lot like the typical popular Bacardi rum cake recipe (that my mother uses) except it's not in a Bundt pan, this cake has cinnamon sugar and this cake has no rum. I knew there were other versions of this cake but most that I have seen have been other alcoholic versions (like a Kaluha version made with chocolate cake and a Harvey Wallbanger version made with Galliano). This non-alcoholic version is better for any event where kids will be eating or maybe your next AA meeting.
This kept tasting better and better to me. It reminded me of a really fresh packaged coffee cake, like a Tastykake Junior, but without the crumb topping. I love crumb topping but I didn't miss it here. You really can't add it since the glaze would make it soggy. This cake does walk that fine line between sogginess and moistness from the glaze. Make sure you distribute that glaze evenly.
Other recipe where pudding works it's magic:
Amish Friendship Chocolate Bread
Big Sugar Cookies
Chocolate Chip Cookies
Creamier and Chewier Oat Cookies
Easy Cream Puff Cake
Gingerbread Men
Strawberry Cake
Another excellent brussels sprout recipe

Roasted Brussels Sprouts and Cauliflower with Orange
The Bon Appétit Cookbook Copyright 2006
1 large head of cauliflower (about 2 pounds), cut into 1-inch florets
1 pound fresh brussels sprouts or frozen, thawed and patted dry, halved if large I am not a fan of frozen brussels sprouts so try those at your own risk if you can't get fresh
1/4 cup olive oil
1/4 cup minced shallot (about 1 large) I used some sweet onion
2 garlic cloves, minced
1 tablespoon grated orange peel
1/2 cup fresh orange juice
1/3 cup chopped fresh Italian parsley I skipped this
Orange slices I skipped this
Additional chopped fresh Italian parsley I skipped this
Preheat oven to 450°F. Combine first 6 ingredients in large bowl; toss to coat. (Can be made 2 hours ahead. Let stand at room temperature.)
Spread vegetables on large rimmed baking sheet. (I put parchment paper down first.) Sprinkle with salt and pepper. Roast in oven until lightly browned and almost tender, stirring once, about 12 minutes. Pour orange juice over. Roast until vegetables are tender and juices evaporate, about 8 minutes. Stir in 1/3 cup chopped parsley. Transfer to serving dish; garnish with orange slices and chopped parsley.
____________________________________
I had some brussels sprouts that I bought cheap at the farmer's market and I really needed to cook them soon. I've made some great brussels sprout recipes but I'm always looking for another great one. I am almost positive my sister made this same recipe for a holiday dinner in the past and I loved it. I just had to make this even though I had to go out and buy cauliflower and an orange. I drew the line at buying the shallots and the parsley. The only shallots I can usually find are expensive and not that great so I used some sweet onion instead. I just skipped the parsley - I didn't miss it.
I don't think this recipe will convert brussels sprout or cauliflower haters. This doesn't disguise these vegetables but this quick roasting leaves them just the way I like them - cooked but still crisp. The touch of orange flavor really works. The orange juice adds just enough sweetness. This was a real winner, in my opinion.
Other great brussels sprouts recipes:
Brussels Sprouts with Garlic and Honey
Oven-Roasted Brussels Sprouts
Shredded Brussels Sprouts
Friday, November 12, 2010
The disaster that wasn't a disaster

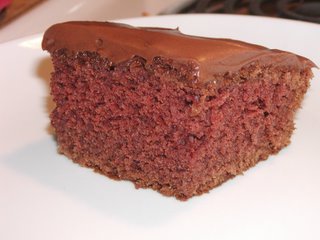
Cola Cake
Mama’s Tea Cakes 101 Soul Food Desserts Copyright 1998
1 cup (2 sticks) unsalted butter
1 ½ cups sugar
2 large eggs, at room temperature
½ cup buttermilk
2 cups all-purpose flour
1 teaspoon baking soda
2 tablespoons unsweetened cocoa powder
1 teaspoon vanilla extract
1 ½ cups mini marshmallows I used cut up mini marshmallows because that's what I had
Preheat oven to 350 degrees F. Place the butter and sugar in a medium mixing bowl and beat with an electric mixer for 2 minutes. Add the eggs and buttermilk, mixing until the batter is smooth. In a separate medium bowl, sift the flour, baking soda, and cocoa powder together. Add the flour mixture and vanilla to the batter. Fold in the marshmallows. Pour the batter into a 10-inch non-stick Bundt pan and bake for 45 minutes or until a toothpick inserted into the center comes out clean.
To decorate, spread incing on top of cake and let it drizzle down the sides.
Icing
½ cup (1 stick) unsalted butter, softened
¼ cup unsweetened cocoa
½ cup cola I used Coke Zero
4 cups powdered sugar
Combine all ingredients in a medium mixing bowl. Mix well with an electric mixer on low speed for 2 minutes or until icing is smooth and spreadable. Makes about 2 ½ cups. This is waaayyyy too much for a Bundt cake but probably perfect for a 9x13-inch cake.
________________________
This started out very promising. It rose beautifully in the oven. At first. Then it collapsed. I'm not sure if it was the fact that I used cut-up marshmallows instead of mini-marshmallows (I dusted them in corn starch so they weren't sticking together) or maybe I used too many marshmallows? From the beginning, I was leery of using the Bundt pan for this. I've always seen this recipe in a 9x13-inch pan. Next time I will use a 9x13-inch pan.
Yes, there will be a next time. Despite the fact that this was basically a sticky gooey mess, between the cake collapsing and the icing being quite soft (which would be fine for a 9x13-inch I think, but not for this Bundt cake), not one crumb of this went to waste. Between home and work, every last bit of this disappeared and people loved it. The marshmallows turned into chewy tasty bits in the cake which was my personal favorite part.
I will say that this did not stick to my new Bundt pan. I've always had a Bundt-type pan but it was flimsy and there was one spot where cakes ALWAYS stuck, ALWAYS. It really turned me off from using that pan. So when I saw a heavy, trademarked official Bundt pan in Goodwill for a couple of dollars, I grabbed it up. Cakes fly out of there, no sticking at all.
Wednesday, November 10, 2010
An inexpensive recipe from an expensive cookbook

Not Your Momma’s Tuna
Mary Engelbreit’s Fan Fare Cookbook Copyright 2010
2 cups uncooked rotini pasta
½ teaspoon olive oil
¼ cup butter or margarine
¼ cup chopped onion
½ cup chopped celery
¼ cup seeded and chopped green bell pepper
¼ cup all-purpose flour
1 cup chicken broth I used all milk
1 cup milk
¼ teaspoon dry mustard
½ teaspoon poultry seasoning
½ cup shredded Colby Jack cheese I used sharp cheddar
1 (12-ounce) can tuna, drained
Preheat the oven to 350 degrees F. Cook the pasta according to the package directions, drain, and rinse with cold water. Toss the pasta with the olive oil to separate and set aside.
In a medium saucepan over medium heat, melt the butter. Add the onion, celery, and green pepper and cook, stirring frequently, for 3 minutes, until the vegetables are tender.
Stir in the flour and cook until blended. Add the broth and milk, stirring until it thickens. Add the dry mustard, poultry seasoning, and half of the cheese; heat until the cheese melts. Remove the skillet from the heat and stir in the tuna and pasta.
Spray an 8-inch square baking dish with nonstick cooking spray. Pour the mixture into the dish and sprinkle with the remaining cheese. Bake uncovered for 15 to 25 minute, or until heated through. Serve hot.
_________________________
This is another case of making something since I had all the ingredients on hand. You don't need canned soup to make tuna casserole. I was worried the green pepper might be overpowering but I had it so I used it. I'm funny about green pepper - I love it in some things, but I just tolerate it in others. It wasn't overpowering here and it didn't ruin the dish for me at all but I wouldn't go out of my way to use it in this recipe again. I like carrots in tuna salad and I think carrots or mushrooms would be good here too. Oh, and peas would be a nice addition.
I was going to use sodium-free chicken bouillon for the broth but I was all out of it. I decided to use another cup of milk since I typically make white sauces with all milk anyway. This makes a smaller casserole, not a 13x9 casserole, so consider that if you are making it to feed a family. You could add more pasta. The sauce was very creamy so I think it could handle more pasta without getting too dry.
I made the pasta and chopped the vegetables (very finely, using my mini-chopper) ahead of time but I didn't put this together until the last minute. I've made casseroles like this ahead of time and they are fine but they are best (the sauce is creamiest) if you put them together at the last minute. With that minimal prep work, this took no time at all to put together.
It was very good and relatively healthy. I used Smart Taste pasta, water-packed tuna and lowfat milk. I like that I got at least a cup of veggies in there (I didn't really measure them). I used regular cheese. There wasn't so much cheese in this that this tasted like another version of macaroni and cheese but that little bit of cheese really rounded out the sauce.
I paid $16.99 (plus tax) for this cookbook! Ridiculous. I bought it at the school book fair when I was volunteering last week. It was 'for a good cause' right? Last year I bought two or three cookbooks there so I was being more frugal. This is collection of recipes submitted by Mary Engelbreit fans. People naturally submit their best recipes in these situations so this type of cookbook (like any Taste of Home cookbook for example) tends to have plenty of appealing recipes. I've bookmarked quite a few from this book. I plan on getting my $16.99 (plus tax) worth out of it. I have another morning scheduled at the book fair later this week - I'd better leave my wallet at home.
Tuesday, November 09, 2010
Yep, another post

Beef Taco Bake
Ground Beef Recipes Copyright 2009
1 pound ground beef
1 can (10 3/4 ounce) tomato soup
1 cup chunky salsa or picante sauce
1/2 cup water
6 flour tortillas (8 inch) or 8 corn tortillas (6 inch) cut into 1 inch pieces
1 cup shredded Cheddar cheese
Cook beef in skillet until browned. Pour off fat.
Add soup, salsa, water, tortillas and half the cheese. Spoon into 2-quart shallow baking dish. Cover.
Bake at 400 F for 30 minutes or until hot. Sprinkle with remaining cheese.
Makes 4 servings
____________________________
Okay, first of all, catch your breath. I know, posts from me two days in a row? Craziness.
This recipe is from one of those small paperback cookbooks that taunt you in the checkout line. The recipes are usually good but the price tag is usually a bit steep - around $4.99 for one of these little guys. I'm pretty good at resisting these for the most part but I do give in occasionally. I may have picked this up somewhere where an additional discount is taken (Costco?) but I still consider it a splurge. Even though I have a few other ground beef cookbooks, I'm always looking for more ideas.
I think that I only needed to pick up the can of soup to make this. I had all the other ingredients on hand already. I happen to like tomato soup - I like the smooth, sweet tomato flavor it has - but you could use more salsa or something else to make this. This isn't the kind of recipe that needs to be followed to the letter.
This reminded me of Jamie’s Mexican Chicken and Tortilla Casserole which uses tortilla chips and I debated using tortilla chips which I also had on hand. I think those would work well too but they would add fat and calories. This recipe isn't too bad if you use the lower sodium version of the tomato soup and lean ground beef. You could use a lower-fat cheese too but there's only 1 cup of cheese in the recipe, about half what you usually see in a recipe like this (Jamie Deen's recipe calls for 3 cups!) You could even use a healthier tortilla.
For me though, this recipe was about using up what was in the house. That is how I operate these days. I think I used the last of a $1 30-pack of corn tortillas in this recipe, the lean beef was probably picked up on clearance, and there is almost always cheese and salsa in our fridge.
Similar recipes I've made:
Beef and Tortilla Casserole (Chilaquiles)
Beef Tamale Skillet Meal
Jamie’s Mexican Chicken and Tortilla Casserole
Quick Tamale Casserole
Monday, November 08, 2010
Loved It!

Russian Cabbage
I Can Cook, You Can Cook Copyright 2003
2 cup of chicken stock or 2 cups of water with 2 teaspoons of chicken bouillon granules
2 cup of beef stock or 2 cups of water with 2 teaspoons of beef bouillon granules
1 cup onion, chopped fine
½ cup of brown sugar
2 tsp of Tabasco
4 cups of cabbage, shredded, very fine (not red)
1 28-ounce can of crushed tomatoes
1/ 2 cup white vinegar
1. Bring stock to a boil.
2. Add onions, brown sugar, vinegar and Tabasco.
3. When onions are soft add cabbage and tomatoes
4. Simmer for about 45 minutes to 1 hour or until cabbage is tender.
5. Adjust seasonings with salt and pepper.
___________________________
This recipe was labeled the author's all-time number one, so I couldn't resist making it. It reminded me of the juice my husband's grandmother cooks her stuffed cabbage in, which is as good as the stuffed cabbage itself. This is a quicker and easier way to get that flavor.
This is something I will definitely be making again and again. It's cheap - the whole pot of soup probably only cost me about $3.00 to make. It's healthy - I used sodium-free bouillon granules and didn't need to add too much salt to this. It's fast compared to many other soups - I'm not even sure I had to cook this 45 minutes.
It's not a main dish soup since it lacks protein but it's light enough to leave enough room for a sandwich or something else to round out the meal.
Wednesday, November 03, 2010
Easy, fast, and cheap

Pizza Quesadillas
Better Homes and Gardens Pizzas Cooking For Today Copyright 1994
½ cup pizza sauce
6 7-inch flour tortillas
2 cups shredded Monterey Jack cheese with jalapeno peppers or Monterey Jack cheese (8 ounces) I used less
1/3 cup finely chopped pepperoni
3 tablespoons sliced pitted ripe olives I didn't use these
Spread some of the pizza sauce on half of each tortilla. Sprinkle Monterey Jack cheese atop pizza sauce on each tortilla. Top with pepperoni and olives. Fold tortillas in half; press down edges gently.
In a large skillet or griddle cook tortillas, 2 or 3 at a time, over medium heat about 4 minutes or till cheese melts, turning once. I used my Griddler.
Cut each tortilla into three triangles. Makes 9 appetizer servings.
Nutritional information per serving: 194 calories, 9 g protein, 13 g carbohydrate, 12 g fat, 27 mg chol, 427 mg sodium, 109 mg potassium
_________________________
I had pepperoni and I had pizza sauce so this recipe caught my eye. I served it for dinner, not as an appetizer. Why not?
I used turkey pepperoni which wasn't on sale and isn't exactly inexpensive but it goes a long way. I think a package costs about $4 and I used some in a pasta dish like this, some in this recipe and I probably used the rest for snacking.
You can pretty much throw anything in a tortilla with a bit of cheese and call it dinner. It's a great way to stretch a small amount of meat and/or to use up leftovers. Tortillas are cheap and they make many varieties of them. It looks like I used basic flour tortillas here but I most often get the whole wheat ones for $1.99 (for 8 of them). They have a decent amount of fiber but they don't break the bank like some of the fancier 'healthier' varieties.
I made these a while ago. Since then I have started folding tortillas up burrito-style. I can get more filling in them that way (without it oozing out) and I can fit more of them on my Griddler at once. I use a bit of cooking spray on them to get the tortillas extra crispy.
I found this cookbook at the Goodwill store. It is part of a series put out by Better Homes and Gardens. Many of my favorite cookbooks were published by Better Homes and Gardens. I have the chicken version and I've made several good recipes from it and this pizza version has a lot of potential in it too.
I paid $2.97 which is kind of a lot, IMO, for a book from Goodwill. This book isn't very large either (but there was a big $12.99 retail price sticker on it). Their cookbooks were topping out at $1.97 but they seemed to have raised their prices on cookbooks at some point. Probably a good thing since it makes me pickier about which cookbooks, if any, come home with me.
Oh, the Goodwill store. I am finding so many treasures there. Many are cooking related so expect to read about those in future posts.
Tuesday, November 02, 2010
It ain't over, I promise
There was a time a few months ago when I thought my blogging days were over. I had no interest in picking up a cookbook. I didn't think I'd buy another one. I even thought, what the heck am I doing with all of these cookbooks????
Well I'm glad I didn't box them all up and get rid of them because I didn't stay in that state for very long. I've acquired quite a few cookbooks since that time, mostly from yard sales and Goodwill. I read them longingly but unfortunately I can't actually cook and blog like I would like to right now. My blog is in limbo, as is my life in many respects.
So please, bear with me. This blog will be back in full force eventually.
It's not like I'm not cooking. We need to eat. But we also can't really afford to eat right now. Divorce is expensive. It's all about stretching a buck around here. It's not always pretty - last night's dinner was hot dogs and boxed macaroni and cheese. Mostly it isn't that bad though. I buy meat on sale (although marked down meat is usually the best deal) and stretch it out.
One small piece of steak (less than a pound) can be frozen, thawed partially and sliced very thinly, marinated in a bit of worcestershire and seasonings (I like to add a bit of cornstarch to the marinade too), sautéed and added to mushrooms and onions that have been sautéed and seasoned with a bit of steak sauce (or Country Bob's All-Purpose Sauce if you're lucky enough to have some) and that small piece of meat will feed all of us. Two bigs cans of mushrooms at about $1/each stretches that out cheaply without adding a lot of calories. I serve this over egg noodles or, occasionally, mashed potatoes (but I seem to be the only mashed potato eater in this house).
Stir fries (served over cheap ramen noodles) and fried rice are two of the best ways to stretch out a small bit of meat. Partially frozen meat can be cut super-thin and it will seem like you have a lot more meat. I add a couple of eggs to my fried rice too. The vegetables vary according to what I have. If I don't have any vegetables for a stir-fry, I like to buy a bag of broccoli slaw. It might be a bit more expensive per pound than other vegetables but it has a variety of vegetables in there (broccoli, cabbage and carrots), it can go right in the pan, no chopping necessary, and cooks up quickly.
Speaking of eggs, they get overlooked for dinner and they really shouldn't. One day I had nothing planned for dinner and an expensive stop at the grocery store on the way home from work appeared to be in my future. Then I remembered I had most of a package of bacon left that I had bought to make baked beans. So I thought, we'll have bacon, scrambled eggs and toast and it was a nice dinner. Grocery store trip averted!
Enchiladas, quesadillas, etc, are great for stretching meat (or eggs) too. Tortillas are cheap (recently they had packs of 30 corn tortillas on sale for $1), so is cheese, especially when you realize you don't need to use a ton of it. There is plenty of room for improvising with what you have on hand too. I made a version of Enchiladas Suizas without the cream, instead using some lite sour cream I had. I mixed that into the sauce. It was even better and lighter than using the whipping cream.
Why are Jell-O cups so expensive? Is there a monopoly on gelatin? There are plenty of pudding cups brands and even though you would think pudding ingredients are more expensive, you can buy pudding cups for 99 cents for a 4-pack but Jell-O seems to be the only one selling gelatin cups in the 6-packs and they are about $2.50??? for 6???? Ridiculous.(I think there are some off-brands selling in larger packages but they are usually crappy flavors like lemon and lime.) I've started buying packages of Jell-O for under a $1 and using small plastic jello molds I already owned to make Jell-O cups. I get 5 out of one small package of Jell-O. I get a better selection of flavors that way too. My son always eats these at home so I don't worry about him losing my molds. Sugar-free Jell-O with a dab of Cabot's whipped cream is a nice bedtime snack for me too.
My husband bought a lot (I mean a LOT) of tuna at one point when he was taking tuna for lunch but then I guess he discovered I wasn't stocking everything else he needed to make tuna salad or he just got lazy and it sat in the cupboard. I've been taking advantage of this bounty and making something with tuna just about every week. Even Dan enjoys tuna noodle casserole so I don't know why I rarely used this cheap protein over the years.
I was buying frozen entrees for lunch and they do go on sale rather cheaply compared to buying lunch out. 5 for $10 is a common sale price, occasionally you will see 6 for $10, the lowest price but that only comes up every once and while. I started making my own frozen entrees and typically will use a box of high fiber pasta (under $2), cheap veggies from the farmer's market (eggplant, mushrooms, whatever) and add some cheese (low-fat ricotta is good, only about $2) and I can get 7-8 lunches out of that one box of pasta and each meal works out to under $1. Or I microwave some potatoes and vegetables and then I make up a cheese sauce and I make up stuffed potatoes. I end up eating the same thing for lunch practically everyday for a while but I mix up my snacks and other foods so it doesn't get boring.
I try not to overpack my sons' lunches. My older son doesn't get a very long lunch period so I try to realistically think of how many baby carrots, crackers, etc he can eat in that time before I pack his lunch. It is deceiving how much food can fit in those baggies and small containers. It's almost comical when you watch the children in the daycare center sit down to their lunches since all their food is emptied out onto plates. You will see a mountain of goldfish crackers and piles of other food sitting in front of these very small children. The small snack-size baggies only need to be about half full.
Overall, while I'm not placing healthiness in the forefront of planning meals, I am doing what I can in that respect. I still buy the high-fiber pastas for the most part. They are more expensive than regular pasta but still a cheap food source. I use Uncle Ben's rice which I've always understood to be the best white rice, maybe even the best rice overall, in terms of the glycemic index, that you can buy. I try to add vegetables, not carbs to meals to stretch them. Cutting back on meat and cheese is healthier. And I simply just try to eat smaller portions and less food.
Sorry - I went off on a tangent there. See, I really miss blogging.
Tuesday, October 26, 2010
Brief Update
I found the house of my dreams. Someone else bought house of my dreams right out from under my nose. I'm in mourning. There is NOTHING else on the market here.
The end.
The end.
Wednesday, October 13, 2010
Maybe not exciting but certainly delicious

Chocolate Chip Cookies
The Blue Willow Inn Bible of Southern Cooking Copyright 2005
2 ¼ cups all-purpose flour
1 teaspoon baking soda
1 teaspoon salt
2 eggs
1 cup (2 sticks) butter, melted
¼ cup granulated sugar
¾ cup firmly packed light brown sugar
1 teaspoon vanilla extract
1 (3.4 ounce) package vanilla instant pudding
1 (12-ounce) package semisweet chocolate chips
1 cup chopped pecans I didn't use these
Preheat oven to 375 degrees. In a medium-size bowl combine the flour, baking soda, and salt. In a large bowl, combine the eggs and butter. With an electric mixer beat on medium speed until the mixture is smooth and creamy. Add the granulated and brown sugars, vanilla extract, and vanilla pudding. Mix well. Slowly add the flour mixture. After the dough is well mixed, stir in the chocolate chips and the pecans if using. Drop by heaping teaspoonful about 2 to 3 inches apart onto a greased cookie sheet. Bake for 8 to 10 minutes on the center rack of the oven.
Yield: About 3 dozen
________________________________
It probably isn't politically correct to praise a processed food but I can't help it - I think dry pudding is a magical ingredient. It's in my favorite oatmeal chocolate chip cookies, that wonderful friendship bread, the very best gingerbread men and the most awesome sugar cookies. These are all out-of-the-park recipes for me.
These cookies were also excellent. My only regret is not supersizing them. I love BIG chocolate chip cookies but I was afraid that with the melted butter, these might be a thin cookie but they had a little bit of height and I think they would have been great made 'big'. Next time. There will be a next time.
I remember seeing this cookbook on one of the home shopping networks. I really wanted it and I even remember looking into getting it cheaper somewhere else but I never did. I found this copy at Goodwill for $2.97. Not as good as a yard sale price but not bad for a hefty book.
I'm sorry I haven't been posting much. My stress level has never been higher. Something has got to give soon.
Tuesday, September 21, 2010
50 years of marriage deserves a crooked cake

Vanilla Cake
(adapted from the Raspberry Laced Vanilla Cake recipe on the Softasilk Cake Flour Box)
3 cups Pillsbury SOFTASILK® Cake Flour
1 tablespoon baking powder
1/2 teaspoon salt
1/4 teaspoon baking soda
1 1/2 cups butter, softened
1 1/4 cups sugar
2/3 cup milk
1 1/2 teaspoons clear vanilla
4 large eggs
1. HEAT oven to 350°F. Spray three 9-inch round cake pans generously with flour no-stick cooking spray. I used a tiered baking set of 4 pans, lined the bottoms with parchment and spray them with Pam for Baking.
2. MIX cake flour, baking powder, salt and baking soda; set aside. Beat 1 1/2 cups butter and sugar in large bowl with electric mixer on high speed until fluffy. Beat in flour mixture, milk, vanilla and eggs on medium speed until blended, scraping bowl occasionally. Beat 2 minutes longer. Spread batter evenly into prepared pans.
(I used the reverse-creaming method. I mixed all the dry ingredients and sugar together and beat that with the softened butter. Then I mixed the wet ingredients and slowly incorporated it into the dry ingredients + butter).
3. BAKE 19 to 23 minutes or until toothpick inserted in center comes out clean. Cool 10 minutes; remove from pans to wire rack. Cool completely.
I used Easy Buttercream for the frosting. The color is natural from the butter and the good vanilla I used. I free-styled a similar frosting for the filling, using only butter, no shortening and adding some melted bittersweet chocolate.
_____________________________________
It was kind of last minute decision to make this cake for my parent's 50th wedding anniversary so I didn't have a lot of time to plan. I had picked up a cute set of vintage tiered pans at a yard sale earlier this summer and I've been itching to use them. I think they were all the rage at one point because when I tried to Google a picture of them for you, I found several sets that were sold by different manufacturers. Mine were made by Vitality but I couldn't find a good picture for you and I'm too lazy to take one myself.
I can see the attraction - there is something about a tiered cake that is enticing. They look very impressive. However, I can also see why they were probably just a passing fad for the home cook.
They are a bit of pain to bake since all four pans bake at different rates.
They are a bitch to make level when you stack them. My first two layers were fine but the third layer was completely wonky.
This style of cake doesn't give you much room for decorating or writing. Fortunately I didn't need to do much of either for this cake.
This cake was slightly difficult to transport. Since I added filling to each layer, this cake was just a bit too tall for my cake box. I had to transport it in a large cardboard box
They are pretty right up until you start cutting into them and then you have instant ugliness. Maybe there is a better way but I cut it starting at the top and working my way down the layers.
Would I make a tiered cake again? Sure. They are kind of fun even with all the quirks.
As for this particular cake, I was originally going to make my chocolate fudge cake but I was hesitant since I've always made that in disposable sheet cake pans and it's very moist. I wasn't sure how it would work for a layer cake like this (even though it's a recipe for a layer cake in it's original form). Then I spotted this recipe on the cake flour box and saw that it was the perfect size (the cake pans all together take batter that equals 1 1/2 boxes of cake mix or 3 regular sized layers). I added a chocolate filling and frosted it with buttercream.
I used the reverse creaming method but with the filling and all it was hard to tell what affect that had on the final result. It didn't hurt.
The cake was butt-ugly after I frosted it. I didn't have time to smooth the frosting as much as I would have liked. It was crooked too. I was starting to think about making a sheet cake but I got out my handy-dandy Pampered Chef Accent Decorator, piped on more frosting, added some gold dragees, topped it with an unattractive topper (all I could find on short notice - apparently most couple married this long score professional cakes), and I don't think it looked too bad.
The flavor was good but there was so much going on with the frosting and filling that it was hard to say just how good (or not) the cake itself was.
Wednesday, September 15, 2010
Random Ramblings
Random Rambling #1: My ability to free-style dinner is no better than it was before I started following all these recipes. It's still very hit and miss. There are lots of misses.
Random Rambling #2: Working within the constraints of time and money, I am coming up with very few dinner ideas. They just aren't coming to me.
Random Rambling #3: I want more Country Bob's All-Purpose sauce! I won some from Annie way back when but I can't get it locally. I know I could order it online but I really try not to resort to that for food. Although I have gone that route on occasion. I ordered several McCormick Pizza Seasoning Grinders from ebay when they were discontinued. I ordered garlic olive oil potato chips from Good Health Natural Foods (although they weren't as good as when they were sold under the Solea brand). I was also overcome with curiosity and had to order coffee syrup from Rhode Island (not as coffee-y as I had hoped).
Random Rambling #4: I've finally found creme fraiche locally now that Alouette is making it. It's one of those ingredients I really NEVER saw anywhere. It's not that different from sour cream, but it is.
Random Rambling #5: I've got recipes to tell you about: anniversary cake, chocolate chip cookies, lemon bundt cake, and some older recipes that I will probably never get around to sharing. I'm just not in the mood. None of the recipes are very exciting (good maybe but not exciting) so you're not missing out on much.

Random Rambling #6: I think I'm on the verge of a nervous breakdown. I'll let you know how that turns out.
Random Rambling #2: Working within the constraints of time and money, I am coming up with very few dinner ideas. They just aren't coming to me.
Random Rambling #3: I want more Country Bob's All-Purpose sauce! I won some from Annie way back when but I can't get it locally. I know I could order it online but I really try not to resort to that for food. Although I have gone that route on occasion. I ordered several McCormick Pizza Seasoning Grinders from ebay when they were discontinued. I ordered garlic olive oil potato chips from Good Health Natural Foods (although they weren't as good as when they were sold under the Solea brand). I was also overcome with curiosity and had to order coffee syrup from Rhode Island (not as coffee-y as I had hoped).
Random Rambling #4: I've finally found creme fraiche locally now that Alouette is making it. It's one of those ingredients I really NEVER saw anywhere. It's not that different from sour cream, but it is.
Random Rambling #5: I've got recipes to tell you about: anniversary cake, chocolate chip cookies, lemon bundt cake, and some older recipes that I will probably never get around to sharing. I'm just not in the mood. None of the recipes are very exciting (good maybe but not exciting) so you're not missing out on much.
Random Rambling #6: I think I'm on the verge of a nervous breakdown. I'll let you know how that turns out.
Tuesday, August 31, 2010
My new favorite salad

Sweet Potato Salad
Southern Living Annual Recipes 2005
2 pounds sweet potatoes, peeled and cut into 1-inch cubes
Vegetable cooking spray
3/4 teaspoon salt, divided
2 celery ribs, diced
1 jalapeño pepper, seeded and finely chopped
1/2 cup diced onion
1/3 cup diced green bell pepper
3 tablespoons brown sugar
2 tablespoons chopped fresh or 1 tablespoon dried parsley flakes I used dried
5 tablespoons white vinegar
1 tablespoon vegetable oil
1 teaspoon hot sauce
1 teaspoon prepared mustard I used Dijon
3 slices peppered or regular bacon, cooked and crumbled (optional)I left this out
Arrange potatoes in an even layer in a 15- x 10-inch jelly-roll pan. Coat with cooking spray, and sprinkle with 1/2 teaspoon salt.
Bake at 400° for 25 minutes or just until tender. Let cool slightly.
Stir together remaining 1/4 teaspoon salt, celery, and next 9 ingredients in a large bowl until blended. Add potatoes, and toss gently to coat. Sprinkle with crumbled bacon, if desired; garnish, if desired. Serve warm or chilled.
______________________________
This salad was so good. The dressing was excellent with that kick from the jalapeño. I didn't add the bacon and I didn't miss it. I think this recipe would work with any potato that can be roasted nicely. I'd be careful making it too far ahead of serving time since the potatoes might get a tad soggy. I only made this for myself and didn't mind the texture of the potatoes the next day (or the day after) but it was definitely best right off. You could roast the potatoes ahead of time but keep them separate fron the rest of the ingredients until you were ready to serve the salad.
I have been accumulating quite a few cookbooks again. Too bad I rarely get a chance to cook anything new these days. I never thought the summer would end basically the same way it started. STUCK.
Friday, August 20, 2010
Basic but delicious

Strawberry Sour Cream
Old-Fashioned Strawberry Recipes with historic notes Copyright 1987,2000
2 scant cups flour
½ tsp. baking powder
¼ tsp. baking soda
½ tsp. salt
¼ tsp. cinnamon
¾ cup sugar
1/3 cup butter, softened
2 eggs, beaten
½ cup dairy sour cream I used lite sour cream
1 tsp. vanilla extract
1 cup fresh strawberries, chopped
½ cup walnuts, chopped I left these out
Combine dry ingredients in a mixing bowl and set aside. In a separate larger bowl cream sugar and butter till light and fluffy. Beat in eggs, then sour cream and vanilla. Stir dry ingredients into liquid mixture quickly until just moistened. Fold in berries and nuts. Pour batter into greased, floured 8x4-inch loaf pan and bake in preheated 350 degree oven for 60 minutes.
____________________________________
This recipe probably would have been more helpful during strawberry season, when I made it, but I just never got around to posting it until now. Although, this is a great use of off-season strawberries. I did use in-season local berries in this bread but they were on their last legs. When strawberries are not that great for whatever reason, I find that using them in baking is still an option.
This is a great basic quick bread recipe with strawberries added. You could probably substitute many different fruits or other add-ins. The nuts would have been great in this but we don't do nuts. I made this the same day I made the Zucchini-Orange Bread and this was definitely more popular (over a 'lite' recipe - go figure).
I didn't get this recipe from an actual cookbook, just one of those small recipe pamplets that I picked up somewhere along the way. They're fun to pick up when traveling and they don't take up a lot of space.
I wish I was trying more new recipes to post but things are just too crazy right now.
Friday, August 06, 2010
Coffee brownies with a twist (or swirl)

Coffee Cinnamon Cream Cheese Brownies
Maxwell House Coffee Drinks & Desserts Cookbook Copyright 1999
3/4 cup (1 1/2 sticks) butter or margarine
4 squares (4 ounces) unsweetened chocolate
2 cups granulated sugar
4 large eggs
3 tbsp instant coffee
1 tsp vanilla extract
1 1/4 cups all-purpose flour
Cream Cheese Topping:
1 pkg (8 ounces) Cream Cheese, softened
1/3 cup granulated sugar
1 large egg
2 tbsp all purpose flour
1/2 tsp ground cinnamon
Prepare the brownie bottom:
Heat the oven to 350 F. Line a 13x9 inch baking pan with foil; lightly butter the foil.
Microwave the butter and chocolate in a large microwaveable bowl on high for 2 minutes or untill the butter has melted. Stir until the chocolate is completely melted.
Stir the sugar into the chocolate until well blended. Mix in the eggs, instant coffee, and vanilla. Stir in the flour until well blended. Spread the brownie batter in the prepared baking pan.
Prepare the Cream Cheese Topping:
Beat the cream cheese, sugar, egg, flour, and cinnamon in the same bowl until well blended. Spoon the mixture over the brownie batter. Swirl with a knife to marbleize.
Bake for 40 minutes or until a toothpick inserted in the center comes out with fudgy crumbs. (Do not OVERBAKE) Cool completly in the pan on a wire rack. Cut into squares. Store the leftover brownies in the refrigerator.
Makes 2 dozen brownies
___________________________________
Most of my baked goods end up with my coworkers and since one of them is allergic to milk (he can handle butter, but other dairy products can lead to trouble) I rarely make anything with cream cheese. Since he was on vacation this week, I decided that I would pull out the cream cheese and of course I had trouble finding a recipe. It's like shopping for a plain black skirt. You think it will be so easy to find but then you can't find one anywhere.
I finally settled on this one. The brownie base of this recipe is almost the same as for the Coffee Brownies. This recipe has more coffee and a bit more flour. They were as solidly fudgy as the Coffee Brownies. These had a stronger coffee flavor but again I think you leave out the coffee without a problem, or cut down on the amount. You could leave out the cinnamon too and just have your basic one-bowl cream cheese swirl brownies which have always been a favorite of mine.
These went over well. I wasn't sure about the coffee-cinnamon twist on an old favorite but I loved it. It was like having a fancy coffee in brownie form.
Thursday, August 05, 2010
The perfect brownie (for me)

Coffee Brownies
Maxwell House Coffee Drinks & Desserts Cookbook Copyright 1999
4 large eggs
2 tablespoons instant coffee
1 teaspoon vanilla extract
¾ cup (1 1/2) sticks) butter or margarine
4 squares (4 ounces) unsweetened chocolate
2 cups granulated sugar
1 cup all-purpose flour
1 cup toasted coarsely chopped nuts (optional) I didn't add these
Bittersweet Coffee Glaze (optional)
Heat the oven to 350 degrees F. Line a 13x9-inch baking pan with foil; lightly butter the foil.
Stir the eggs, instant coffee, and vanilla in a small bowl until well blended; set aside.
Microwave the butter and chocolate in a microwavable bowl on High for 2 minutes or until the butter is melted. Stir until the chocolate is completely melted. Stir until the chocolate is completely melted.
Stir the sugar into the chocolate mixture until well blended. Mix in the egg mixture. Stir in the flour and nuts. Spread the batter in the prepared pan.
Bake for 30 minutes or until a toothpick inserted in the center comes out with fudgy crumbs. (Do not overbake.) Cool completely in the pan on a wire rack. Spread the Bittersweet Coffee Glaze over the brownies, if desired. Cut into squares to serve. Serve in tightly covered container.
Makes 24 brownies.
Bittersweet Coffee Glaze
6 squares (6 ounces) bittersweet chocolate
5 tablespoons corn syrup
1 tablespoon butter or margarine
1 teaspoon instant coffee
Microwave the chocolate, corn syrup, butter, and instant coffee in a medium microwavable bowl on High for 2 minutes or until the butter is melted. Stir until the chocolate is melted. (You might want to add the coffee powder last since it almost burned on me.) Cool slightly. Spread over the brownies.
____________________________
I picked up this cookbook for 25 cents at a yard sale earlier this summer. I was thrilled because so many of the recipes sound great AND they don't require buying any extra ingredients. Not that they are all plain-Jane but they happen to call for ingredients I already have in my pantry. I always keep a jar of instant coffee on hand specifically for recipes (I can't drink instant coffee).
This recipe made a huge dent in my chocolate surplus. It was worth it! I don't discriminate - I love all kinds of brownies - cakey, fudgy, chewey, frosted, not frosted, glazed, not glazed but my favorite type is fudgy and these were the perfect example of fudgy and the glaze made them even better. This recipe is basically a variation of one bowl brownies - very easy to prepare. I liked the hint of coffee but it wasn't overwhelming. I don't think it would be a problem to leave the coffee out (of the brownies or the glaze) if that isn't your thing or if you just don't have any.
The glaze ended up setting up really nicely. I am glazed-challenged and often end up with a sticky mess but not this time. I did put them in the fridge for a bit but once the glaze was set, I took them out of the fridge and kept them out. The glaze stayed firm for days.
For a while there, I could bake something, taste a small bit of it, then pass it along but with a recipe as good as this I end up sampling more than just a small bit. These were very dangerous. I was very sad when they were gone.
Tuesday, July 27, 2010
Not cookies

Zucchini-Orange Bread
Cooking Light Annual Recipes 2009
3 cups all-purpose flour (about 13 1/2 ounces)
1 teaspoon salt
1 teaspoon baking powder
1/4 teaspoon baking soda
1 cup granulated sugar
1/2 cup egg substitute I used 2 eggs
1/3 cup canola oil
1 tablespoon grated orange rind
1 tablespoon fresh orange juice
2 cups shredded zucchini (about 1 large)
1/2 cup coarsely chopped walnuts I omitted these
Cooking spray
Glaze:
1/2 cup powdered sugar
2 tablespoons fresh orange juice
1. Preheat oven to 350°.
2. To prepare bread, lightly spoon flour into dry measuring cups; level with a knife. Combine flour and next 3 ingredients (through baking soda) in a large bowl, stirring with a whisk; make a well in center of mixture. Combine granulated sugar and next 4 ingredients (through 1 tablespoon juice). Add sugar mixture to flour mixture, stirring just until moist. Fold in zucchini and walnuts. Divide batter between 2 (8 x 4–inch) loaf pans coated with cooking spray. Bake at 350° for 50 minutes or until a wooden pick inserted in center comes out clean. Cool 10 minutes in pans on a wire rack; remove from pans.
3. To prepare glaze, combine powdered sugar and 2 tablespoons juice, stirring with a whisk. Drizzle evenly over warm loaves. Cool completely on wire rack.
Nutritional Information: Calories:145 (32% from fat) Fat:5.1g (sat 0.4g,mono 2.1,poly 2.3g) Protein:2.8g Carbohydrate:22.5g Fiber:0.7g Cholesterol:0.0mg Iron:1mg Sodium:142mg Calcium:21mg
______________________________
I had some zucchini that I originally picked up thinking I would use it in something savory but then I started thinking zucchini bread. As soon as I saw this recipe, I looked no further. I've been in a citrus-y mood lately.
This is a 'light' recipe and at first I thought it was going to be a tad dry but even though there isn't a lot of glaze, I think it infused just enough moisture into this bread. I thought this was better the second day.
I made this a couple of weeks ago and I really wish I had some of it in front of me right now. I do have another zucchini ....
Monday, July 26, 2010
Busy weekend
Oh, the recipes I could be posting about right now - 'big' oatmeal cookies, those famous World Peace Cookies, Asian glazed chicken drumsticks, strawberry bread, orange-zucchini bread, the most incredible coffee brownies. But, I don't have any of those blog posts ready - sorry! Stay tuned.
I cooked up a storm this weekend. Why would I do that on one of the hottest weekends in recent history? Well, we have air conditioning and it was too hot to do much outside so why not? I've been on a cooking ahead tangent since I am tired of rushing home to make dinner during the week and I am also tired of spending so much money on food. Planning and cooking ahead saves time and money.
I made a variation of Enchiladas Suizas last weekend and I put together two meal-size pans of them, one we ate last week and one was put in the freezer. Instead of using one package of boneless thighs for one dinner, I easily stretched it out to cover two dinners. I bought a pack of corn tortillas for $1 on sale, that had 30 tortillas in it. Not only did I make those two pans of Enchiladas Suizas, I also free-styled a Mexican lasagne with the last of them, using some ground beef I got on sale and using my homemade taco seasoning (scroll down on that link for the recipe).
I made enough Venison in Sauce for two meals last weekend too. This weekend I made Crockpot Pulled Pork. That wasn't planned but I came across pork shoulder on sale. One shoulder roast yielded three containers of pulled pork, for sandwiches or recipes like Barbecued-Pork Burritos and Barbecue Pork Pot Pie.
I cooked a lot of rice since I find it freezes well and I can use it for fried rice or as a quick side dish. Speaking of fried rice, I cooked some chicken thighs to be used in fried rice or stir-fries. It stretches a lot further that way.
I roasted beets. I bought some on a whim on Friday and I didn't want to forget about them like I forget about much of the produce I buy on a whim. I love beets and they really aren't hard to prepare except for the time it takes to peel them, which isn't an incredibly long time.
I sautéed a lot of cabbage. My favorite produce lady at auction had large heads of cabbage for $1 so I grabbed one. They weren't great cabbages - not very green like I prefer for cole slaw but perfect for cabbage and noodles later in the future. I never tried freezing the sautéed cabbage separately but I think it's going to work.
I made sloppy joes. I roasted chicken drumsticks.
The next couple of weeks should go a bit easier.
Tuesday, July 20, 2010
Sorry, more cookies
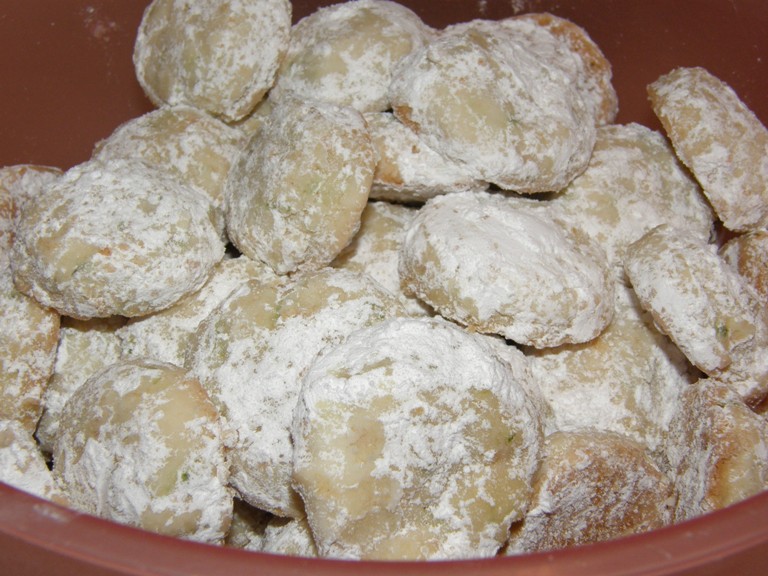
Lime Cooler Cookies
The Ugly Binder, from the internet
1 cup bleached all-purpose flour
3/4 cup confectioners’ sugar, divided
1 tsp finely grated lime zest
1 stick (1/2 cup) salted butter, softened
1/4 tsp vanilla extract
Adjust oven rack to lower-middle position and preheat oven to 350 deg. F. Line two cookie sheets with either parchment paper.
In a medium bowl combine the flour, 1/4 cup confectioners’ sugar and lime zest. Add the butter and vanilla; beat, either with a mixer or a wooden spoon, until a dough forms.
Drop dough by generous teaspoons onto the cookie sheet, spacing evenly. (I made these small, using my small scoop and flattening them a bit.) Bake one sheet at a time for about 15 minutes, until cookie bottoms are golden brown. Transfer cookies to a wire rack to cool completely. Repeat with remaining dough.
Place the remaining 1/2 cup confectioners’ sugar in a quart or gallon-sized zip-loc bag. Working with a dozen at a time, drop cookies into the sugar and shake to coat. The cookies must be completely cooled.
_________________________
These were a last minute addition to my future SIL's shower. I woke up that morning thinking I should make one more cookie, something easy, something that I had the ingredients on hand to make. I just happened to have a bunch of limes since I've been enjoying a margarita here and there.
There are a million variations of this type of cookie, some with nuts, some with coconut, some plain, etc. There is a reason there are so many variations - this is basically a very good, melt-in-your mouth buttery cookie that many people love. No one would bother coming up with so many variations for a lousy cookie.
I can remember eating the boxed lemon cooler cookies (do they still make those?) These were much better of course. I love citrus infused baked goods and I love making them ever since I purchased a Microplane which makes zesting citrus so easy.
This recipe didn't make much but it is easily doubled, tripled, or whatever. The cookies don't really spread so you can fit a lot of them on a baking sheet at one time.
I know, the cookie recipes are getting boring but that's all I got.
Subscribe to:
Posts (Atom)